Introduction
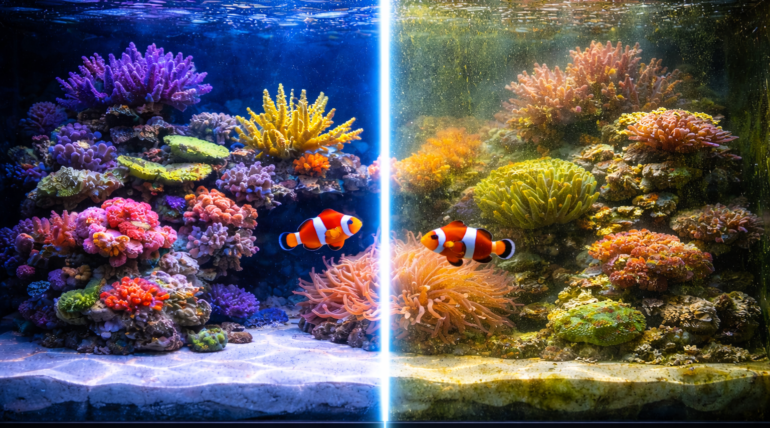
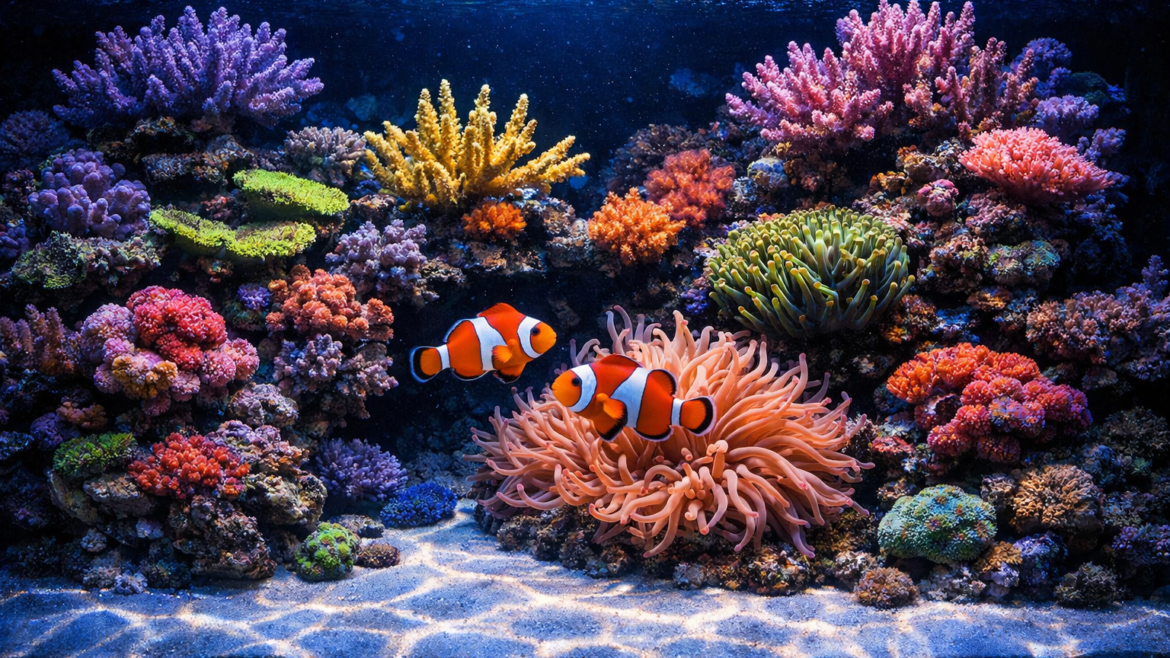
There is something almost hypnotic about a thriving reef aquarium. The slow sway of coral polyps, the flash of a clownfish darting between anemone tentacles, the deep blue glow of actinic light at dusk — it is one of the most rewarding things you can create at home.
But getting there takes planning. A reef tank is not a fish tank with coral thrown in. It is a living, breathing ecosystem that requires the right equipment, the right water chemistry and the right approach from day one.
The good news: thousands of reefers before you have made every possible mistake so you don’t have to. This guide gives you the complete roadmap — from choosing your first tank to adding your first coral — without the guesswork.
Step 1: Choose the Right Tank Size
The single most common piece of advice in the reef keeping hobby is this: go bigger than you think you need.
A larger water volume is more forgiving. Parameters change slowly in 100 gallons. They can crash overnight in 20. For a first reef tank, the sweet spot is somewhere between 50 and 100 gallons — large enough to be stable, small enough to be manageable.
What to look for in a reef tank:
- Rimless glass or low-iron glass — standard glass has a green tint that distorts coral color under blue light. Low-iron (starphire) glass is optically clear.
- Built-in overflow — a reef-ready tank with an internal overflow box makes plumbing to a sump straightforward and keeps the display clean.
- Adequate depth — at least 18″ of water depth allows you to keep a variety of coral at different light levels.
- All-in-one vs sump-based — AIO tanks have filtration built into the back chambers, which is simpler for beginners. Sump-based systems give you more flexibility and water volume.
Pro tip: Whatever size you choose, buy the largest sump that fits under your stand. The extra water volume gives you a buffer when things go wrong — and things will go wrong.
Step 2: Plan Your Filtration System
Filtration in a reef tank works differently from a freshwater aquarium. You are not just removing ammonia — you are managing a complex balance of nitrogen compounds, phosphate, silicate, dissolved organics and trace elements simultaneously.
The core filtration components:
Protein Skimmer The protein skimmer is arguably the most important piece of filtration equipment in a reef system. It removes dissolved organic compounds — fish waste, uneaten food, dead cells — before they break down into nitrate and phosphate. A good skimmer works around the clock with zero effort from you.
Size your skimmer conservatively. A skimmer rated for 150 gallons on a 75-gallon tank will perform significantly better than one rated exactly for your volume.
Return Pump The return pump moves water from your sump back to the display tank. You want enough flow to turn the entire system volume over 5–10 times per hour. A 100-gallon system (display + sump) should have a return pump rated for at least 500–1000 GPH after accounting for head pressure loss.
Circulation Pumps Coral needs flow — not just filtration flow, but random, turbulent, multi-directional flow throughout the display. Powerheads or wavemakers placed on opposite sides of the tank create the chaotic flow pattern that mimics a natural reef. Aim for 20–40 times the tank volume per hour in total circulation.
Mechanical Filtration Filter socks or roller mats capture particulate matter before it settles and decomposes in the sump. Clean or replace filter socks at least twice a week — a full, dirty filter sock is worse than no filter at all.
Step 3: Set Up Your Reverse Osmosis System
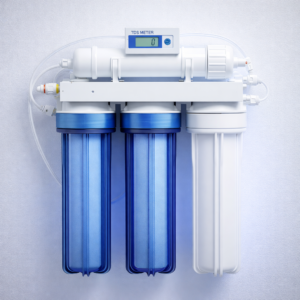
Tap water contains chlorine, chloramines, nitrates, phosphates, silicates and heavy metals. Every one of these will cause problems in a reef tank — algae blooms, coral stress, equipment corrosion. There is no workaround. You need a dedicated water purification system.
A reverse osmosis and deionization (RO/DI) system removes virtually all dissolved contaminants and produces water that reads 0 TDS (total dissolved solids) on a meter. This is the only water you should use for mixing salt and topping off evaporation.
What to look for in an RO/DI system:
- Dual carbon block stages — essential for removing both chlorine and chloramines from city water
- DOW Filmtec RO membrane — the industry standard for reliability and rejection rates
- Color-changing DI resin — lets you see exactly when the resin is exhausted
- Inline TDS meter — confirms your output is hitting 0 TDS before you mix salt
- 100 GPD or higher — for most home reef systems, 100 gallons per day is sufficient; larger systems or frequent water change schedules benefit from 200 GPD
Important: Always verify your RO/DI output reads 0 TDS before mixing saltwater. Even 5 TDS introduces enough silicates and phosphates to fuel algae for months.
Step 4: Choose Your Lighting
Lighting is what makes reef keeping expensive — and what separates a thriving reef from a dying one. Coral contains symbiotic algae called zooxanthellae that photosynthesise light into energy. Without the right light spectrum and intensity, coral cannot grow, color up or survive long-term.
What matters in reef lighting:
PAR (Photosynthetically Active Radiation) PAR measures the intensity of usable light reaching your coral. Different coral types require different PAR levels:
- Soft corals and beginner LPS: 50–150 PAR
- Mixed reef and demanding LPS: 150–250 PAR
- SPS and acropora: 250–400+ PAR
Spectrum Reef corals respond best to blue and violet wavelengths (420–470nm) which drive photosynthesis and coral fluorescence. A good reef LED will have multiple blue, royal blue, UV and violet channels alongside white for a balanced, natural appearance.
Coverage A single fixture has a coverage footprint — the area over which it delivers adequate PAR. Always check manufacturer PAR maps at the depth of your tank, not just peak output numbers.
Recommended LED fixtures for beginners:
- AI Hydra 32 HD — excellent PAR output, wide 100° spread, myAI app control. Covers up to 24″×24″ for SPS.
- Kessil A360XE Tuna Blue — legendary shimmer effect, fanless, whisper quiet. Perfect for smaller tanks up to 24″×24″.
- Reef Factory Reef Flare Pro Blue S — blue-focused spectrum with EOI optics. Smart Reef app control. 65W.
Step 5: Mix Your Saltwater
With your RO/DI water ready, you need to mix it with a quality reef salt to create artificial seawater. This is not as simple as pouring in some table salt — reef salt mixes are precisely formulated to match natural seawater chemistry.
How to mix saltwater correctly:
- Fill your mixing container with 0 TDS RO/DI water
- Add a powerhead or circulation pump to keep the water moving
- Slowly add salt mix while stirring — never add salt to a still bucket
- Allow 24 hours of mixing and aeration before testing
- Target specific gravity of 1.025–1.026 (35–36 ppt salinity)
- Adjust temperature to match your tank before adding
Choosing a salt mix:
For a first reef tank, choose a reputable salt that mixes to natural seawater parameters — calcium around 400–420 mg/L, alkalinity 8–9 dKH, magnesium 1280–1320 mg/L. Avoid budget salt mixes with inconsistent batch-to-batch chemistry.
Step 6: Cycle Your Tank
This is the step that kills the patience of every new reef keeper — and the step you absolutely cannot rush.
The nitrogen cycle is the biological process that establishes beneficial bacteria in your live rock and substrate. These bacteria convert toxic ammonia (from fish waste and decaying matter) into nitrite, and then into nitrate. Without an established cycle, ammonia will spike to lethal levels within days of adding livestock.
How long does cycling take?
A fishless cycle using ammonia dosing typically takes 4–6 weeks. Seeding with a commercial bacteria product (like Dr. Tim’s or Fritz Turbo Start) can accelerate this to 2–3 weeks, but cannot skip it entirely.
How to know your cycle is complete:
- Ammonia reads 0 ppm
- Nitrite reads 0 ppm
- Nitrate is present (typically 5–20 ppm in a new system)
- Adding a dose of ammonia returns to 0 within 24 hours
Do not add coral or fish until all three conditions above are met. This is the most commonly ignored advice in reef keeping and the most expensive mistake to make.
Step 7: Add Live Rock and Aquascape
Live rock is the biological foundation of your reef. It provides:
- Surface area for beneficial bacteria to colonize
- Natural filtration through the porous rock structure
- Coralline algae growth that gives your reef a mature, natural appearance
- A framework for mounting coral frags
Aquascaping principles:
- Leave space between rocks and the glass — allows flow to reach all areas and makes maintenance easier
- Create caves and overhangs — fish use these for shelter and it looks more natural
- Secure your rock — use aquarium-safe epoxy or cement. An unstable rock formation that collapses can crack your tank or crush coral
- Less is more — a common mistake is cramming too much rock into the display. Aim for 1–1.5 lbs of live rock per gallon as a rough guide
Step 8: Set Up Your Water Parameter Monitoring
Before you add a single coral, you need to know what your water parameters are — and you need a reliable way to monitor them continuously.
The parameters that matter most in a reef tank:
| Parameter | Target Range |
|---|---|
| Salinity | 1.025–1.026 (35–36 ppt) |
| Temperature | 76–78°F (24–26°C) |
| pH | 8.1–8.3 |
| Alkalinity (KH) | 8–9 dKH |
| Calcium | 400–450 mg/L |
| Magnesium | 1280–1350 mg/L |
| Nitrate | <10 ppm for SPS, <20 ppm for mixed reef |
| Phosphate | 0.03–0.1 ppm |
Manual testing vs automated monitoring:
Manual test kits (Salifert, Red Sea, Hanna) are accurate and essential for establishing your baseline. But they only give you a snapshot — a parameter that crashes between tests can cost you expensive coral before you notice.
An aquarium controller like the Neptune Apex or CoralVue HYDROS monitors temperature, pH and equipment status continuously, alerting your phone the moment something drifts outside safe limits. For a serious reef keeper, a controller is not optional — it is the difference between catching a heater failure in time and losing everything.
Step 9: Add Your First Fish
With your cycle complete and parameters stable, you can begin adding livestock — fish first, coral second.
How to introduce fish safely:
- Quarantine first — a separate QT tank allows you to treat new fish for ich and other parasites before they enter your display. Ich in a reef tank cannot be treated with copper (which kills invertebrates) — prevention through quarantine is your only practical option.
- Start with hardy species — clownfish, chromis, watchman gobies and firefish are forgiving of the minor parameter fluctuations common in new systems.
- Add slowly — introduce one or two fish at a time, waiting 2–4 weeks between additions to allow your biological filtration to adjust.
- Feed lightly — in a new system, uneaten food spikes ammonia quickly. Feed only what your fish consume in 2 minutes.
Step 10: Add Your First Coral
This is the moment you have been working toward. With a cycled, stable, fish-stocked system running for several weeks, you are ready for coral.
Start with forgiving species:
Soft corals are the ideal starting point — mushroom corals (Discosoma), leather corals (Sarcophyton), green star polyps (GSP) and zoanthids are extremely hardy, grow quickly and tolerate a wider range of conditions than LPS or SPS.
Easy LPS like hammer coral, torch coral and frogspawn are the next step — they have more specific requirements but are rewarding and grow quickly with the right care.
SPS corals (acropora, montipora) are for established systems with stable, dialed-in parameters. They will not tolerate the minor swings that softies and LPS shrug off.
Placement and acclimation:
- Drip acclimate new coral for 30–45 minutes before adding to the tank
- Dip all coral in a coral dip solution (Coral RX, Revive) before introduction — pest hitchhikers like acropora-eating flatworms are invisible to the naked eye
- Start low in the tank — you can always move coral up toward higher PAR as it acclimates, but a coral burned by too much light too soon can take months to recover
Ongoing Maintenance: What to Do Every Week
A reef tank is not a set-and-forget system. These weekly tasks keep your ecosystem stable:
- Water change — 10–15% weekly. Dilutes accumulated nitrate, phosphate and trace element imbalances.
- Test parameters — alkalinity, calcium, nitrate and phosphate at minimum. pH and temperature continuously via controller.
- Clean the skimmer cup — a dirty skimmer neck reduces efficiency dramatically.
- Top off evaporation — use fresh RO/DI water only, never saltwater. Evaporation leaves salt behind; the tank gets saltier if you top off with saltwater.
- Check equipment — pumps, heaters, lights and flow pumps. Listen for unusual noise, check for salt creep on connectors.
Common Beginner Mistakes to Avoid
Rushing the cycle. There is no shortcut. A partial cycle is not a cycle.
Adding too much too fast. Every addition increases bioload. Give your system time to adjust between additions.
Chasing perfect parameters. Stability matters more than perfection. A system consistently at 8.2 dKH is better for coral than one that swings between 7.5 and 9.0 while you chase 8.3.
Buying coral before your tank is ready. The coral store will always have coral. There will always be more coral. Wait until your system is genuinely stable.
Ignoring the skimmer. A full, uncleaned skimmer cup is returning nutrients to your water. Clean it twice a week minimum.
Tap water. Not once. Not for topping off. Not for an emergency. Only RO/DI.
Final Thoughts
Setting up a reef tank is one of the most complex — and most rewarding — hobbies you can pursue. The learning curve is real, but it flattens quickly once you understand the principles behind what you are doing.
The reefers who succeed long-term are not the ones with the most expensive equipment. They are the ones who are consistent — consistent with water changes, consistent with testing, consistent with giving their systems time to stabilize before making changes.
Start with quality equipment, follow the cycle, test regularly and resist the urge to rush. The reef will come.
Looking for the equipment mentioned in this guide? Browse our full range of reef-grade LED lighting, protein skimmers, RO/DI systems, dosing pumps and aquarium controllers at Malta Sea.